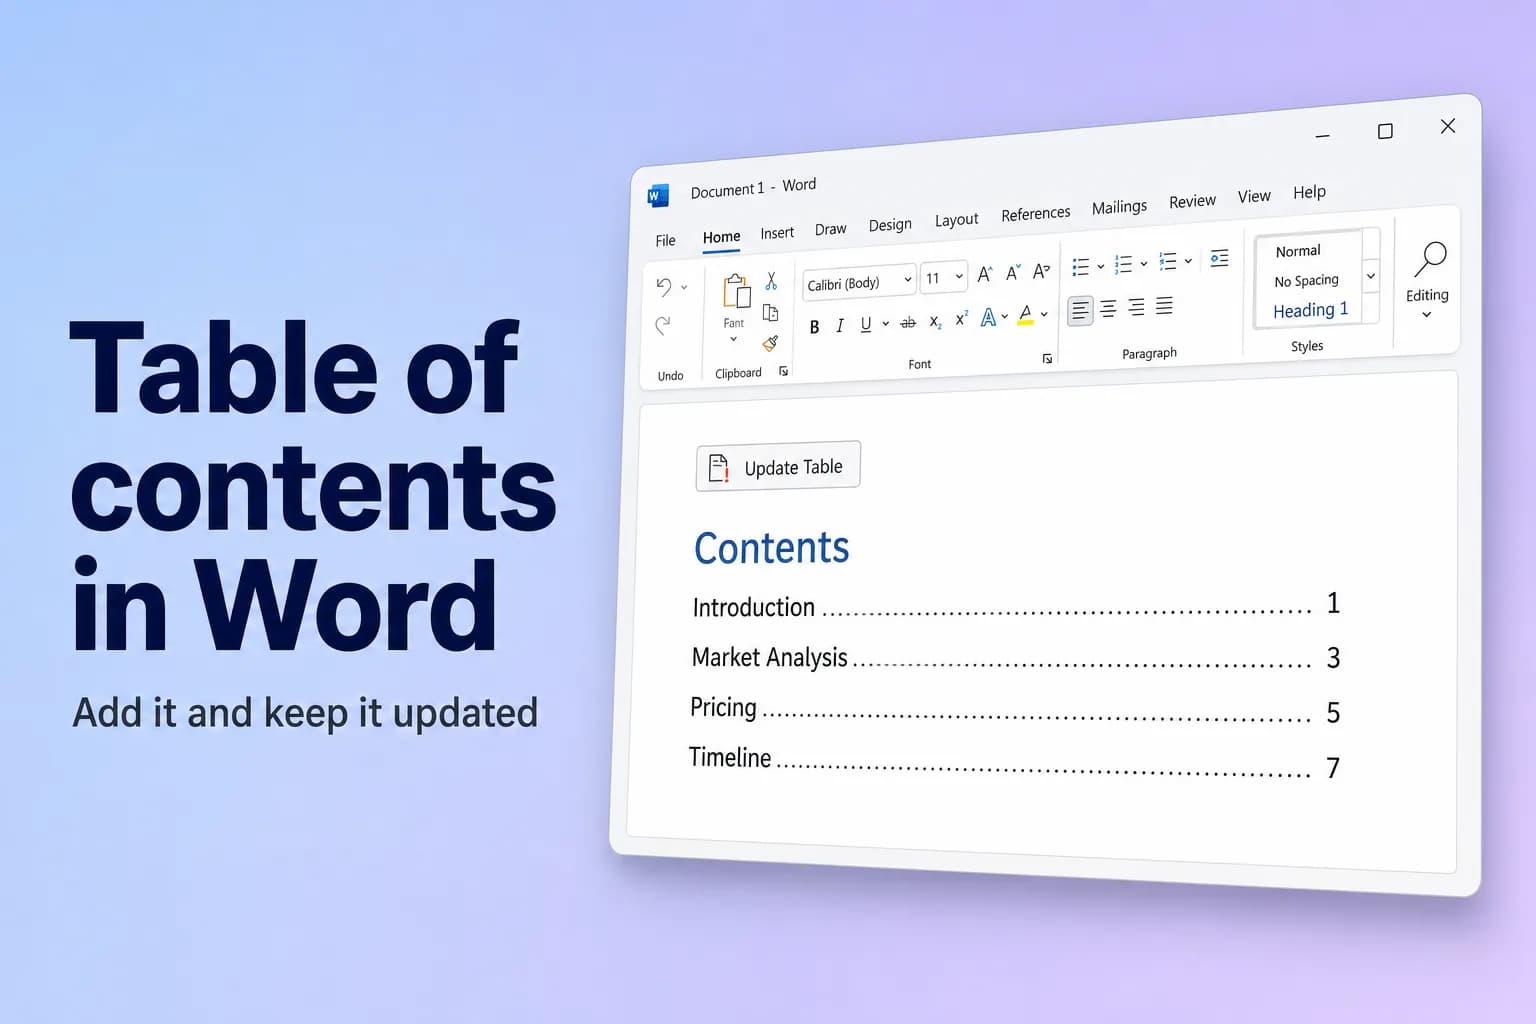
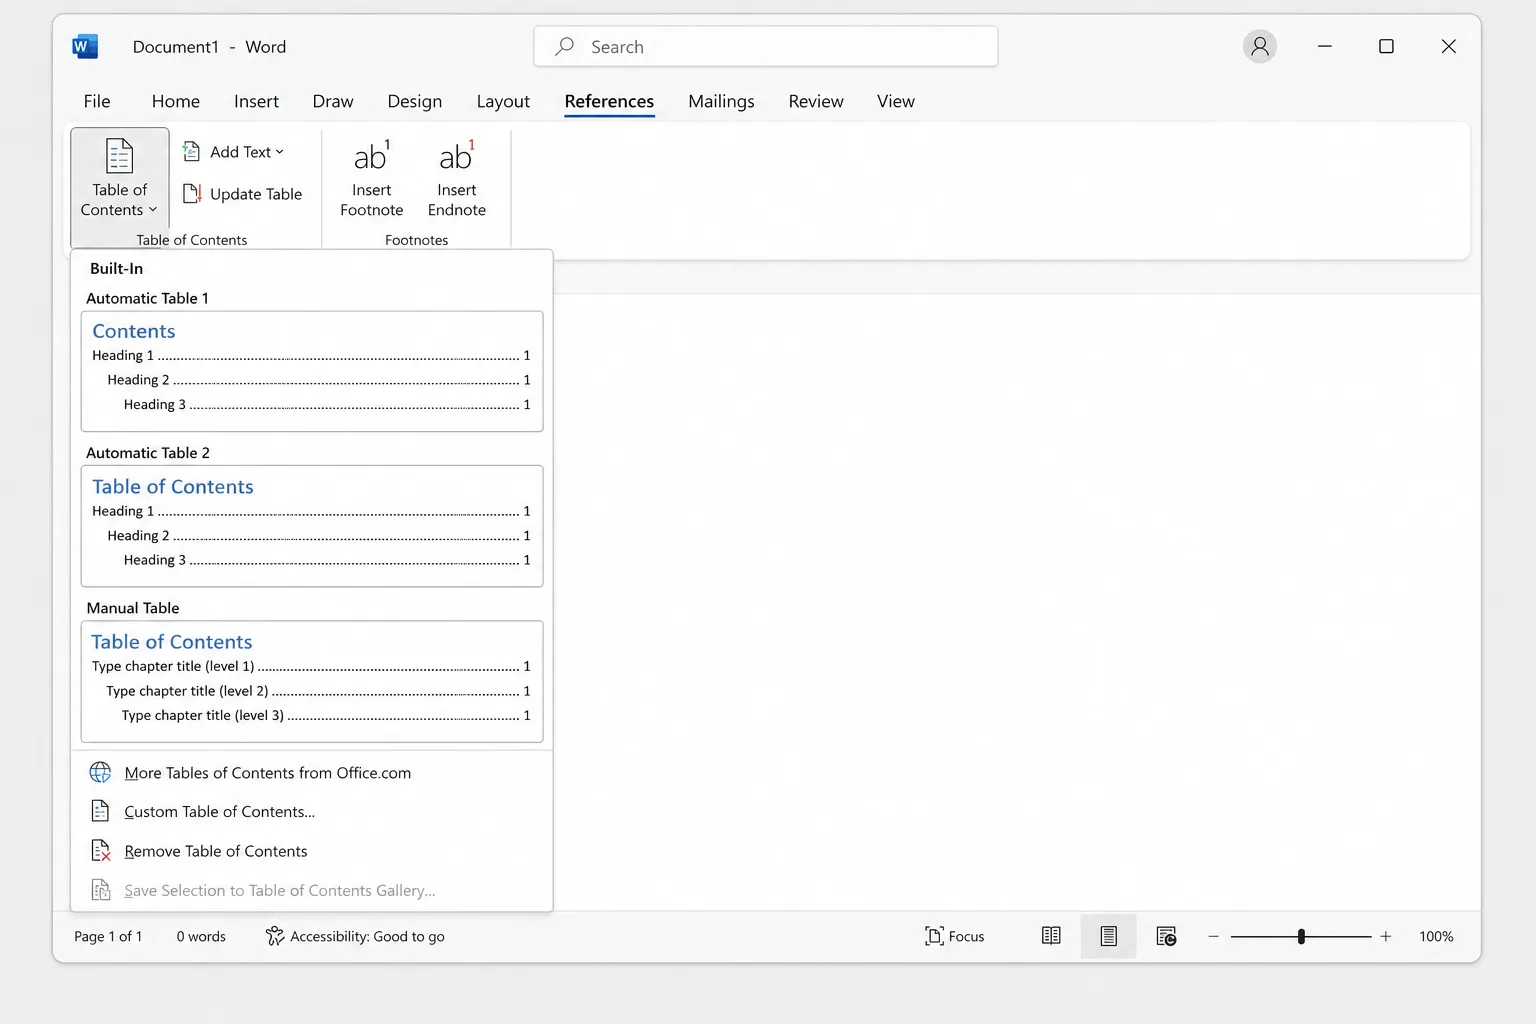
To add a table of contents in Word, format your headings with the Heading 1, Heading 2 and Heading 3 styles, click where the table should go, then choose References → Table of Contents → Automatic Table 1 (or Automatic Table 2). Word lists every heading with its page number and a clickable link.
The catch: Word builds the table only from text that uses a heading style. Headings you made bold and bigger by hand won't appear, and the table doesn't refresh on its own when you edit the document. Both are quick to fix, and both are covered below.
| What you want | Where to find it |
|---|---|
| A table built from your headings | References → Table of Contents → Automatic Table 1 or 2 |
| Choose levels, dots or links | References → Table of Contents → Custom Table of Contents |
| Refresh after edits | References → Update Table, or click the table and press F9 |
| Add a line that isn't a heading yet | References → Add Text |
| Delete the table | References → Table of Contents → Remove Table of Contents |
| Type every entry yourself | References → Table of Contents → Manual Table (never updates) |
Step 1: Apply heading styles to your headings
- Click in your first main heading, for example "Introduction".
- Go to Home → Styles and click Heading 1.
- Repeat for every main section. Use Heading 2 for subsections and Heading 3 for the level below that.
Keyboard shortcuts make this faster: Ctrl+Alt+1, Ctrl+Alt+2 and Ctrl+Alt+3 on Windows, Cmd+Option+1, Cmd+Option+2 and Cmd+Option+3 on Mac.
No Heading 3 in the gallery? Use Heading 2 once and Word adds the next level.
Quick check: open View → Navigation Pane. Every heading listed there will appear in your table of contents. If a heading is missing from the pane, it isn't using a heading style yet.
Step 2: Insert the table of contents
- Click where you want the table, usually on a blank line after the title page.
- Go to References → Table of Contents.
- Pick a built-in style:
- Automatic Table 1 adds the title "Contents".
- Automatic Table 2 adds the title "Table of Contents".
Both include Heading 1 to Heading 3, dotted leaders, right-aligned page numbers and entries you can click to jump to that section.
To give the table its own page, click just after it and press Ctrl+Enter (Cmd+Return on Mac) to insert a page break. If that leaves an empty page behind, see how to delete a page in Word.
Customize it: levels, dots, page numbers and links
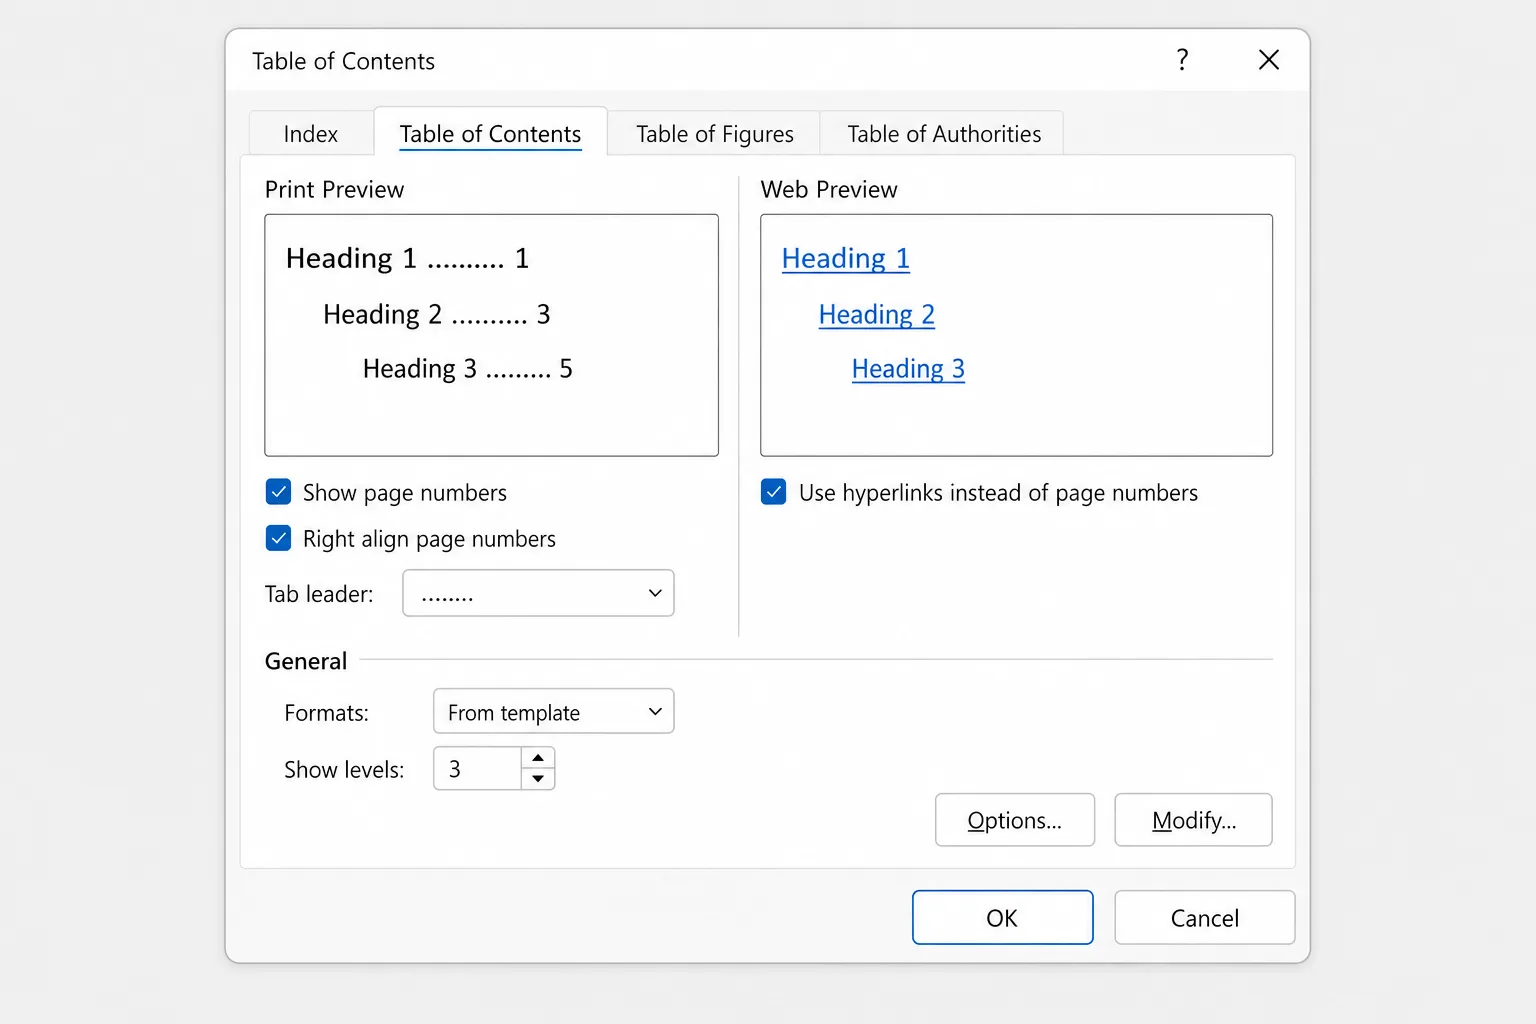
For more control, choose References → Table of Contents → Custom Table of Contents. The dialog lets you:
- Show levels: how many heading levels appear. Set it to 2 for a shorter table with only Heading 1 and Heading 2, or raise it (up to 9) for more detail.
- Show page numbers and Right align page numbers: turn page numbers off, or place them right after each heading instead of at the margin.
- Tab leader: dots (the default), dashes, a solid line, or (none).
- Use hyperlinks instead of page numbers: makes each entry a clickable link. Leave it ticked unless you specifically want plain text entries.
- Formats: ready-made looks such as Classic, Formal or Simple.
- Options: choose which styles feed the table, for example your own custom heading style.
Click OK. If you already have a table of contents, Word asks whether to replace it; click Yes.
Change the font, spacing or indent of the entries
Each level of the table has its own style: TOC 1 for Heading 1 entries, TOC 2 for Heading 2, and so on. Formatting the table by hand is wiped out by the next full update; changing these styles lasts.
- Open References → Table of Contents → Custom Table of Contents.
- Make sure Formats is set to From template. The Modify button only works with that format.
- Click Modify, select TOC 1, and click Modify again.
- Change the font, size, bold, spacing or indent, then click OK.
- Repeat for TOC 2 and TOC 3 if you need to, then click OK to rebuild the table.
Update the table of contents after you edit
Word doesn't refresh the table as you type. After you add, rename or move headings, or after page numbers shift:
- Click inside the table of contents.
- Go to References → Update Table, or click Update Table on the small bar that appears above the table, or press
F9. (On some Mac keyboards, pressFn+F9.) - Choose one option:
- Update page numbers only keeps the entries and just fixes the numbers.
- Update entire table also picks up new, renamed and deleted headings.
- Click OK.
When in doubt, choose Update entire table. It only costs you edits typed directly into the table.
Add a line that isn't formatted as a heading
References → Add Text puts the current paragraph into the table without opening the Styles gallery:
- Click in the paragraph you want to include.
- Go to References → Add Text and choose Level 1, Level 2 or Level 3.
- Update the table.
Add Text works by applying the matching heading style, so the paragraph will take on that heading's look. To keep a heading out of the table, choose Do Not Show in Table of Contents from the same menu.
Make a manual table of contents
References → Table of Contents → Manual Table inserts placeholder entries that you overwrite yourself, page numbers included. Word never updates it, so use it only when you can't apply heading styles.
Remove the table of contents
Go to References → Table of Contents → Remove Table of Contents. Your headings and their styles stay as they are.
Word for Mac
The steps are the same in Word for Microsoft 365 on Mac, from References → Table of Contents to References → Update Table. The only difference: settings that Windows keeps under File → Options are under Word → Preferences (or Settings) on Mac.
Word for the web
Word for the web can insert and update a table of contents too:
- Apply heading styles from the Home tab.
- Click where the table should go, select References → Table of Contents, and choose Insert Table of Contents. (In some versions, Insert Table of Contents sits directly on the References tab.)
- To refresh it later, right-click the table and choose Update Table of Contents.
Formatting choices are more limited than in the desktop app. For the full Custom Table of Contents dialog, select Open in Desktop App, make the change and save; the table stays when you reopen the file online.
If your table of contents isn't working
- "No table of contents entries found." No text in the document uses a heading style. Apply Heading 1 and friends (Step 1), then choose Update entire table.
- Some headings are missing. They use Normal text that only looks like a heading, they sit at a level deeper than Show levels allows (a Heading 4 in a three-level table), or the table was refreshed with Update page numbers only, which never adds new entries. Fix the style or the level, then update the entire table.
- Page numbers are wrong. The table was built before your last edits. Update it. To refresh it automatically before printing, turn on File → Options → Display → Update fields before printing.
- Grey shading appears on the table when you click it. That's field shading, a reminder that the table is generated by Word. It doesn't print. To hide it on screen, go to File → Options → Advanced → Show document content → Field shading and choose Never.
- "Error! Bookmark not defined." An entry points to a heading that no longer exists, often after headings were deleted or text was pasted in from another document. Click the table and choose Update entire table. If the error just appeared after an update, press
Ctrl+Z(Cmd+Z) to undo it, then fix the headings first. - You see
{ TOC \o "1-3" \h \z \u }instead of the table. Field codes are showing. PressAlt+F9(Option+F9on Mac) to switch back. - Clicking an entry doesn't jump to the heading. In Word for Windows you need to hold
Ctrlwhile clicking by default. To follow links with a plain click on Windows, clear File → Options → Advanced → Use CTRL + Click to follow hyperlink. In a PDF, links survive when you use File → Save As → PDF rather than printing to PDF.
Frequently Asked Questions
How do I make a table of contents in Word automatically? Apply Heading 1, Heading 2 and Heading 3 styles to your headings, then choose References → Table of Contents → Automatic Table 1. Word builds the list and page numbers for you.
Does the table of contents update by itself? No. Update it with References → Update Table or F9 after editing. To make sure printed copies are current, turn on Update fields before printing under File → Options → Display.
How do I add dots between the heading and the page number? Open Custom Table of Contents and set Tab leader to the dotted line. The automatic tables already use dots.
Can I make the table of contents clickable? It already is. Automatic tables link each entry to its heading; hold Ctrl and click to follow the link on Windows.
How do I add a table of contents in Google Docs? Use heading styles the same way, then go to Insert → Table of contents. Pick a style with page numbers or with links.
Write the structure first, then let Word number it
A table of contents is only as good as the headings behind it. If you're starting from a blank page, CoreGPT for Word can draft a full first version, such as a project proposal with clear sections like Introduction, Market Analysis, Pricing and Timeline, from a short prompt inside Word. Apply heading styles to those sections and the table of contents follows. It's free to start.
 CoreGPT
Project Proposal: Customer Portal Redesign
This proposal outlines a three-month plan to redesign the customer portal, reduce support tickets by 30% and improve onboarding for new accounts.
Objectives: simplify navigation, add self-service billing and introduce guided setup for first-time users.
Timeline and budget are detailed in the sections below.
Here’s a draft with an overview, objectives and next steps:
- Overview and goals
- Three key objectives
- Timeline and budget
Try it: CoreGPT for Word
Related reading: