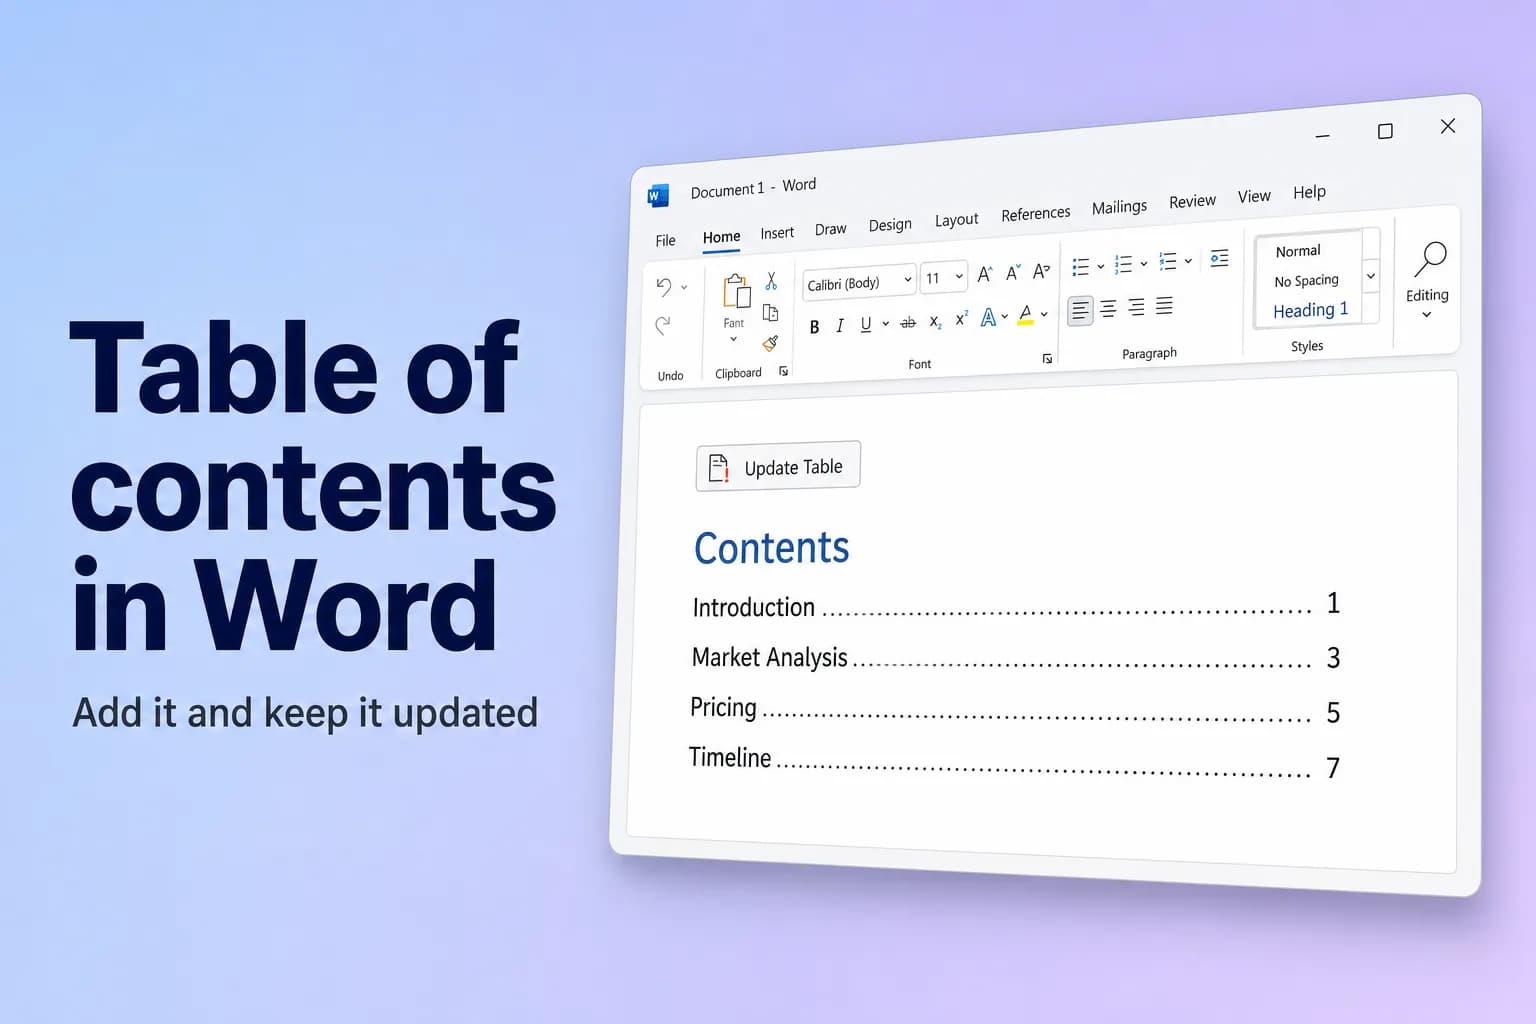
Word में table of contents जोड़ने के लिए अपने headings को Heading 1, Heading 2 और Heading 3 styles से format करें, जहाँ table चाहिए वहाँ click करें, फिर References → Table of Contents → Automatic Table 1 (या Automatic Table 2) चुनें। Word हर heading को उसके page number और clickable link के साथ सूचीबद्ध कर देता है।
पेच यह है: Word table सिर्फ़ उस text से बनाता है जिस पर heading style लगी हो। जिन headings को आपने हाथ से bold और बड़ा किया है वे नहीं आएँगे, और document edit करने पर table अपने-आप refresh नहीं होता। दोनों बातें जल्दी ठीक हो जाती हैं, और दोनों नीचे बताई गई हैं।
इस article में Word के menu और button के नाम English version के हिसाब से दिए गए हैं।
| आप क्या चाहते हैं | कहाँ मिलेगा |
|---|---|
| अपने headings से बनी table | References → Table of Contents → Automatic Table 1 या 2 |
| Levels, dots या links चुनना | References → Table of Contents → Custom Table of Contents |
| Edits के बाद refresh करना | References → Update Table, या table पर click करके F9 दबाएँ |
| ऐसी line जोड़ना जो अभी heading नहीं है | References → Add Text |
| Table delete करना | References → Table of Contents → Remove Table of Contents |
| हर entry खुद type करना | References → Table of Contents → Manual Table (कभी update नहीं होती) |
Step 1: अपने headings पर heading styles लगाएँ
- अपने पहले मुख्य heading में click करें, जैसे "Introduction"।
- Home → Styles पर जाएँ और Heading 1 पर click करें।
- हर मुख्य section के लिए यही दोहराएँ। Subsections के लिए Heading 2 और उसके नीचे वाले स्तर के लिए Heading 3 इस्तेमाल करें।
Keyboard shortcuts से यह तेज़ होता है: Windows पर Ctrl+Alt+1, Ctrl+Alt+2 और Ctrl+Alt+3, Mac पर Cmd+Option+1, Cmd+Option+2 और Cmd+Option+3।
Gallery में Heading 3 नहीं है? एक बार Heading 2 इस्तेमाल करें और Word अगला स्तर जोड़ देता है।
जल्दी जाँच: View → Navigation Pane खोलें। वहाँ सूचीबद्ध हर heading आपके table of contents में आएगी। अगर कोई heading pane में नहीं है, तो उस पर अभी heading style नहीं लगी है।
Step 2: Table of contents डालें
- जहाँ table चाहिए वहाँ click करें, आमतौर पर title page के बाद किसी खाली line पर।
- References → Table of Contents पर जाएँ।
- कोई built-in style चुनें:
- Automatic Table 1 "Contents" title जोड़ता है।
- Automatic Table 2 "Table of Contents" title जोड़ता है।
दोनों में Heading 1 से Heading 3 तक, बिंदीदार leaders, दाईं ओर संरेखित page numbers और ऐसी entries होती हैं जिन पर click करके उस section पर पहुँचा जा सकता है।
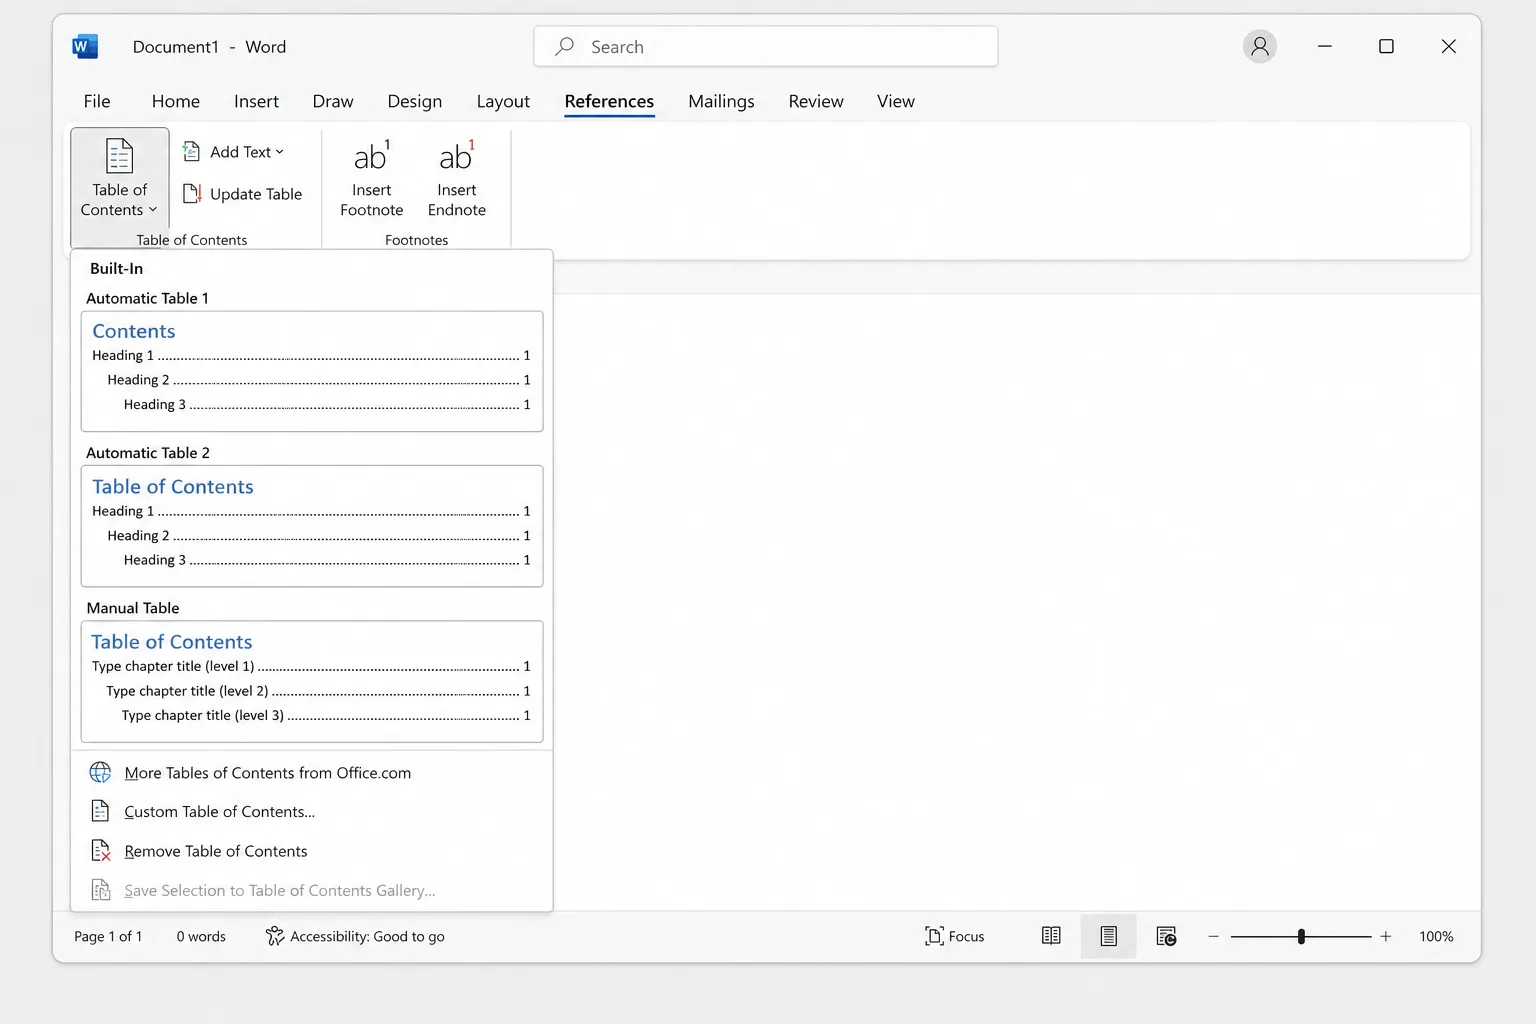
Table को अलग page देने के लिए उसके ठीक बाद click करें और page break डालने के लिए Ctrl+Enter (Mac पर Cmd+Return) दबाएँ। अगर इससे पीछे खाली page रह जाए, तो Word में page कैसे delete करें देखें।
अपने हिसाब से बदलें: levels, dots, page numbers और links
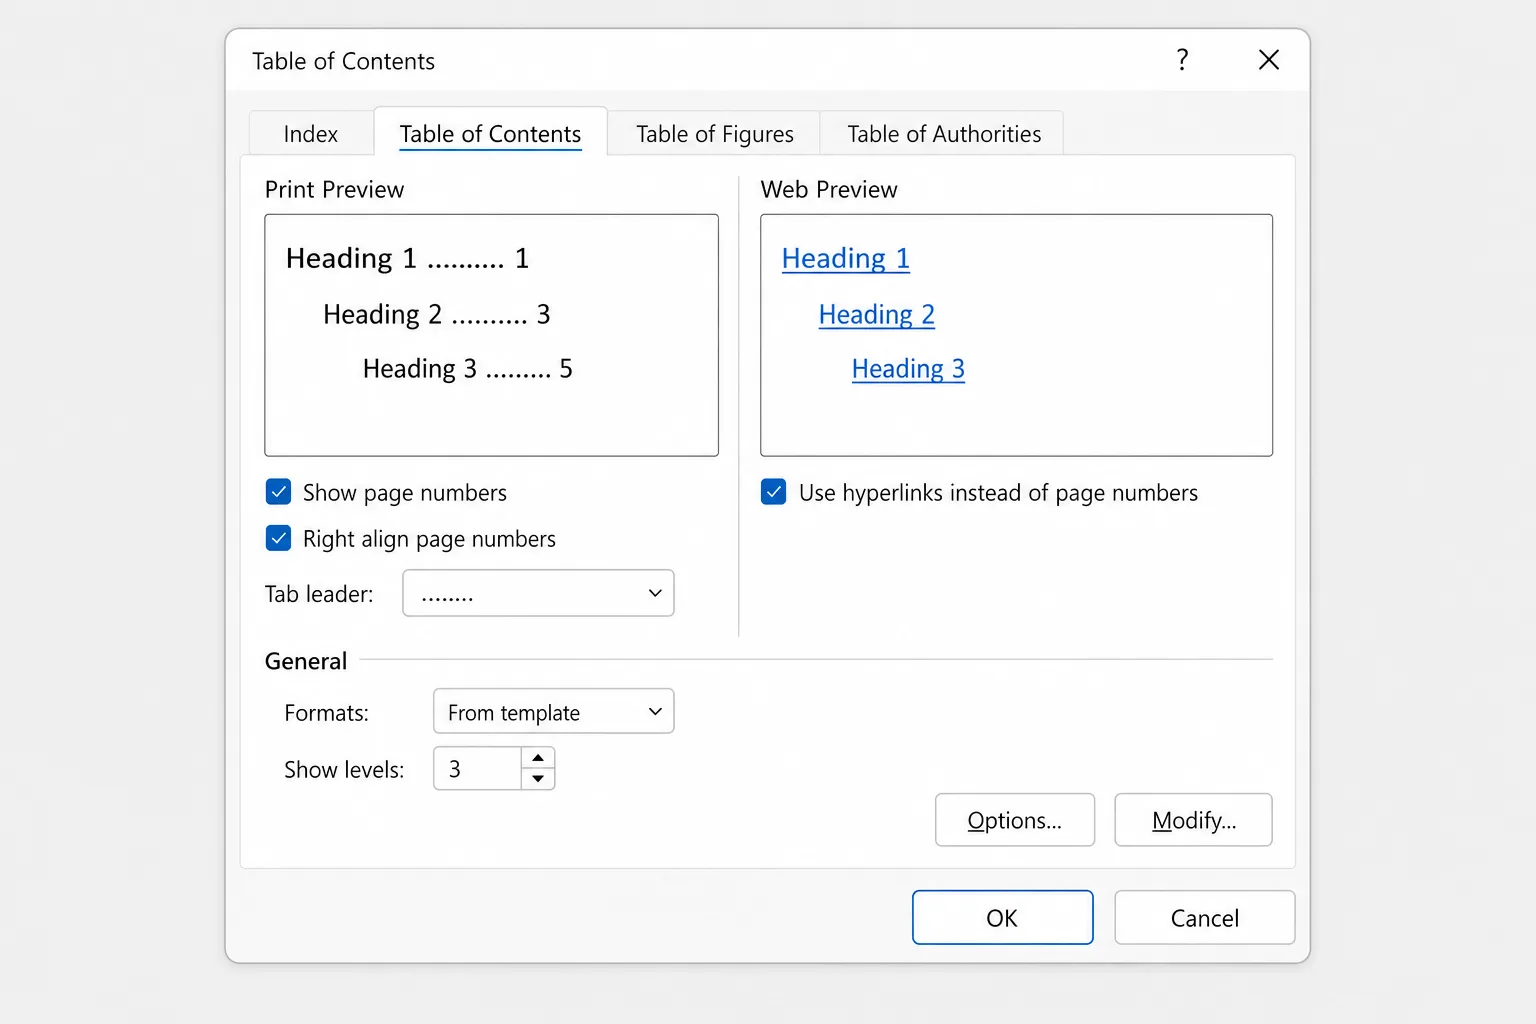
ज़्यादा नियंत्रण के लिए References → Table of Contents → Custom Table of Contents चुनें। Dialog में आप ये कर सकते हैं:
- Show levels: कितने heading levels दिखें। सिर्फ़ Heading 1 और Heading 2 वाली छोटी table के लिए इसे 2 पर रखें, या ज़्यादा detail के लिए बढ़ाएँ (9 तक)।
- Show page numbers और Right align page numbers: page numbers बंद करें, या उन्हें margin पर रखने की जगह हर heading के ठीक बाद रखें।
- Tab leader: dots (डिफ़ॉल्ट), dashes, ठोस रेखा, या (none)।
- Use hyperlinks instead of page numbers: हर entry को clickable link बनाता है। जब तक आपको सादे text वाली entries ही न चाहिए हों, इस पर tick रहने दें।
- Formats: तैयार look, जैसे Classic, Formal या Simple।
- Options: चुनें कि table किन styles से बने, जैसे आपकी अपनी custom heading style।
OK पर click करें। अगर आपके पास पहले से table of contents है, तो Word पूछता है कि उसे बदलना है या नहीं; Yes पर click करें।
Entries का font, spacing या indent बदलें
Table के हर स्तर की अपनी style होती है: Heading 1 entries के लिए TOC 1, Heading 2 के लिए TOC 2, और इसी तरह आगे। हाथ से की गई formatting अगले पूरे update में मिट जाती है; इन styles को बदलना टिकता है।
- References → Table of Contents → Custom Table of Contents खोलें।
- पक्का करें कि Formats From template पर सेट है। Modify button सिर्फ़ उसी format के साथ काम करता है।
- Modify पर click करें, TOC 1 चुनें, और फिर Modify पर click करें।
- Font, size, bold, spacing या indent बदलें, फिर OK पर click करें।
- ज़रूरत हो तो TOC 2 और TOC 3 के लिए दोहराएँ, फिर table दोबारा बनाने के लिए OK पर click करें।
Edit करने के बाद table of contents को update करें
Word आपके type करते समय table को refresh नहीं करता। जब आप headings जोड़ें, उनके नाम बदलें या उन्हें खिसकाएँ, या जब page numbers बदल जाएँ:
- Table of contents के अंदर click करें।
- References → Update Table पर जाएँ, या table के ऊपर दिखने वाली छोटी bar पर Update Table पर click करें, या
F9दबाएँ। (कुछ Mac keyboards परFn+F9दबाएँ।) - कोई एक option चुनें:
- Update page numbers only entries को वैसा ही रखता है और सिर्फ़ numbers ठीक करता है।
- Update entire table नए, बदले हुए नामों वाले और हटाए गए headings को भी पकड़ता है।
- OK पर click करें।
शक हो तो Update entire table चुनें। इसकी कीमत बस इतनी है कि table में सीधे type की गई edits चली जाती हैं।
ऐसी line जोड़ें जो heading के रूप में format नहीं है
References → Add Text Styles gallery खोले बिना मौजूदा paragraph को table में डाल देता है:
- उस paragraph में click करें जिसे शामिल करना है।
- References → Add Text पर जाएँ और Level 1, Level 2 या Level 3 चुनें।
- Table को update करें।
Add Text मेल खाती heading style लगाकर काम करता है, इसलिए paragraph उस heading का look अपना लेगा। किसी heading को table से बाहर रखने के लिए उसी menu से Do Not Show in Table of Contents चुनें।
Manual table of contents बनाएँ
References → Table of Contents → Manual Table placeholder entries डालता है जिन्हें आप खुद बदलते हैं, page numbers समेत। Word इसे कभी update नहीं करता, इसलिए इसे तभी इस्तेमाल करें जब आप heading styles न लगा सकते हों।
Table of contents हटाएँ
References → Table of Contents → Remove Table of Contents पर जाएँ। आपके headings और उनकी styles वैसी ही रहती हैं।
Word for Mac
Mac पर Word for Microsoft 365 में steps वही हैं, References → Table of Contents से लेकर References → Update Table तक। बस एक फ़र्क: जो settings Windows में File → Options के नीचे होती हैं, वे Mac पर Word → Preferences (या Settings) के नीचे हैं।
Word for the web
Word for the web भी table of contents डाल और update कर सकता है:
- Home tab से heading styles लगाएँ।
- जहाँ table चाहिए वहाँ click करें, References → Table of Contents चुनें, और Insert Table of Contents चुनें। (कुछ versions में Insert Table of Contents सीधे References tab पर होता है।)
- बाद में refresh करने के लिए table पर right-click करें और Update Table of Contents चुनें।
Formatting के विकल्प desktop app की तुलना में सीमित हैं। पूरा Custom Table of Contents dialog पाने के लिए Open in Desktop App चुनें, बदलाव करें और save करें; file को online दोबारा खोलने पर table बनी रहती है।
अगर आपका table of contents काम नहीं कर रहा
- "No table of contents entries found." Document में किसी भी text पर heading style नहीं लगी है। Heading 1 वगैरह लगाएँ (Step 1), फिर Update entire table चुनें।
- कुछ headings गायब हैं। वे Normal text हैं जो सिर्फ़ heading जैसे दिखते हैं, वे Show levels की अनुमति से ज़्यादा गहरे स्तर पर हैं (तीन-स्तर वाली table में Heading 4), या table को Update page numbers only से refresh किया गया था, जो कभी नई entries नहीं जोड़ता। Style या स्तर ठीक करें, फिर पूरी table update करें।
- Page numbers गलत हैं। Table आपकी आखिरी edits से पहले बनी थी। उसे update करें। Print करने से पहले अपने-आप refresh करने के लिए File → Options → Display → Update fields before printing चालू करें।
- Table पर click करने से grey shading दिखती है। यह field shading है, एक याद दिलाने वाला संकेत कि table Word ने बनाई है। यह print नहीं होती। Screen पर इसे छिपाने के लिए File → Options → Advanced → Show document content → Field shading पर जाएँ और Never चुनें।
- "Error! Bookmark not defined." कोई entry ऐसे heading की ओर इशारा करती है जो अब मौजूद नहीं है, अक्सर headings delete होने या किसी दूसरे document से text paste करने के बाद। Table पर click करें और Update entire table चुनें। अगर error अभी-अभी update के बाद आया है, तो उसे undo करने के लिए
Ctrl+Z(Cmd+Z) दबाएँ, फिर पहले headings ठीक करें। - आपको table की जगह
{ TOC \o "1-3" \h \z \u }दिखता है। Field codes दिख रहे हैं। वापस जाने के लिएAlt+F9(Mac परOption+F9) दबाएँ। - Entry पर click करने से heading पर नहीं पहुँचता। Windows के Word में डिफ़ॉल्ट रूप से click करते समय
Ctrlदबाए रखना पड़ता है। Windows पर सादे click से links खोलने के लिए File → Options → Advanced → Use CTRL + Click to follow hyperlink का tick हटाएँ। PDF में links तब बचे रहते हैं जब आप PDF में print करने की जगह File → Save As → PDF इस्तेमाल करते हैं।
अक्सर पूछे जाने वाले सवाल
Word में table of contents अपने-आप कैसे बनाएँ? अपने headings पर Heading 1, Heading 2 और Heading 3 styles लगाएँ, फिर References → Table of Contents → Automatic Table 1 चुनें। Word सूची और page numbers आपके लिए बना देता है।
क्या table of contents अपने-आप update होता है? नहीं। Edit करने के बाद उसे References → Update Table या F9 से update करें। छपी हुई copies ताज़ा रहें, यह पक्का करने के लिए File → Options → Display में Update fields before printing चालू करें।
Heading और page number के बीच dots कैसे जोड़ें? Custom Table of Contents खोलें और Tab leader को बिंदीदार रेखा पर सेट करें। Automatic tables में पहले से dots होते हैं।
क्या table of contents को clickable बनाया जा सकता है? वह पहले से है। Automatic tables हर entry को उसके heading से जोड़ती हैं; Windows पर link खोलने के लिए Ctrl दबाए रखकर click करें।
Google Docs में table of contents कैसे जोड़ें? Heading styles उसी तरह इस्तेमाल करें, फिर Insert → Table of contents पर जाएँ। Page numbers वाली या links वाली style चुनें।
पहले ढाँचा लिखें, फिर Word से number करवाएँ
Table of contents उतनी ही अच्छी होती है जितने अच्छे उसके पीछे के headings हों। अगर आप खाली page से शुरू कर रहे हैं, तो CoreGPT for Word Word के अंदर ही एक छोटे prompt से पहला पूरा draft बना सकता है, जैसे Introduction, Market Analysis, Pricing और Timeline जैसे साफ़ sections वाला project proposal। उन sections पर heading styles लगाएँ और table of contents अपने-आप बन जाती है। शुरू करना free है।
 CoreGPT
प्रोजेक्ट प्रपोज़ल: कस्टमर पोर्टल का रीडिज़ाइन
यह प्रपोज़ल कस्टमर पोर्टल को रीडिज़ाइन करने की तीन महीने की योजना बताता है, जिससे सपोर्ट टिकट 30% घटेंगे और नए अकाउंट का ऑनबोर्डिंग बेहतर होगा।
उद्देश्य: नेविगेशन आसान बनाना, सेल्फ़-सर्विस बिलिंग जोड़ना और पहली बार इस्तेमाल करने वालों के लिए गाइडेड सेटअप लाना।
टाइमलाइन और बजट का ब्योरा नीचे के सेक्शन में दिया गया है।
यह रहा ओवरव्यू, उद्देश्य और अगले क़दमों के साथ ड्राफ़्ट:
- ओवरव्यू और लक्ष्य
- तीन मुख्य उद्देश्य
- टाइमलाइन और बजट
आज़माएँ: CoreGPT for Word
ये भी पढ़ें: