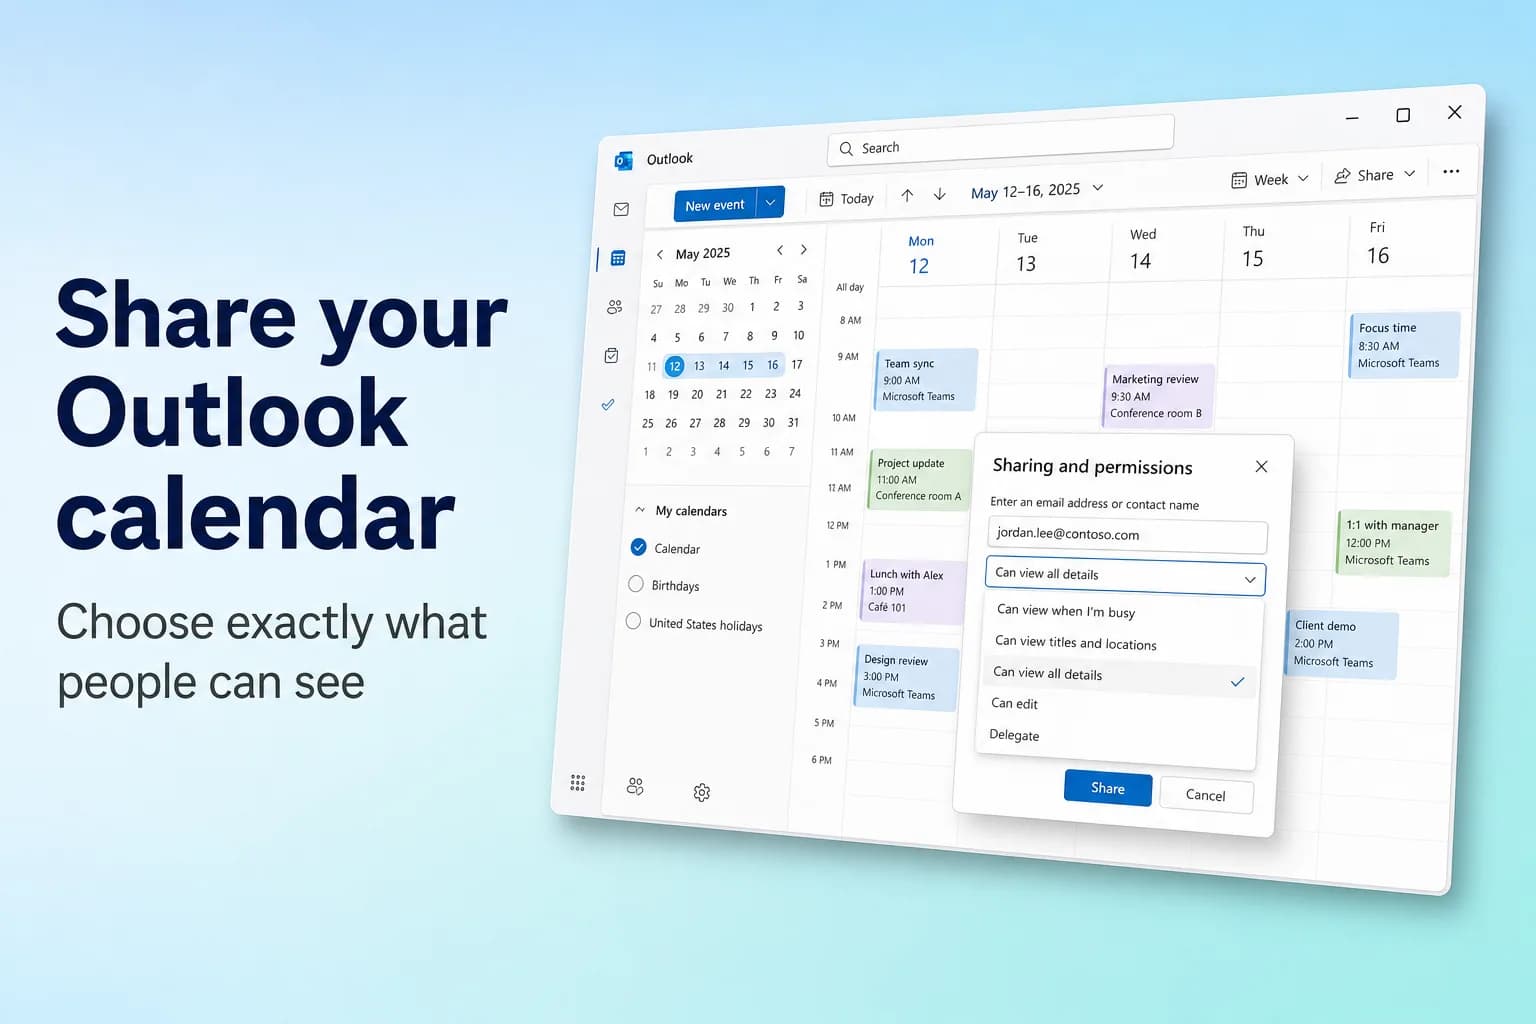
अपना Outlook calendar शेयर करने के लिए Calendar पर जाएँ, Home tab पर Share calendar चुनें (या calendar पर right-click करके Sharing and permissions चुनें), व्यक्ति का नाम या email address डालें, Can view all details जैसा कोई permission level चुनें, और Share चुनें। उन्हें email invitation मिलता है, और स्वीकार करते ही आपका calendar उनके calendar के बगल में दिखने लगता है।
आप क्या शेयर कर सकते हैं, यह इस पर निर्भर करता है कि उसे कौन पा रहा है। अपनी organization के अंदर आप किसी को भी view, edit या delegate access दे सकते हैं। बाहर के लोगों (Gmail users समेत) को सिर्फ़ view access मिल सकता है, और आपका admin उसे और सीमित कर सकता है, कभी-कभी सिर्फ़ free/busy समय तक।
इस article में Outlook के menu और button के नाम English version के हिसाब से दिए गए हैं।
| Outlook version | Sharing कहाँ से शुरू करें |
|---|---|
| New Outlook for Windows | Calendar → Home → Share calendar |
| Outlook on the web और Outlook.com | Calendar → Share, या calendar पर right-click करें → Sharing and permissions |
| Classic Outlook for Windows | Calendar → Home → Share Calendar (यह Calendar Properties खोलता है) |
| Outlook for Mac | Calendar पर Control-click करें → Sharing Permissions |
| Outlook for iPhone और Android | Calendar → calendar menu → calendar के बगल का gear icon |
| Outlook न इस्तेमाल करने वाला कोई व्यक्ति | Settings से ICS या HTML link publish करें |
Permission levels: हर एक क्या दिखाता है
वह सबसे निचला level चुनें जिससे काम चल जाए। आप इसे बाद में कभी भी बदल सकते हैं।
| Permission level | दूसरा व्यक्ति क्या कर सकता है | क्या आपकी organization के बाहर के लोगों के लिए उपलब्ध है? |
|---|---|---|
| Can view when I'm busy | सिर्फ़ यह देख सकता है कि आप कब busy हैं, कोई title या details नहीं | हाँ |
| Can view titles and locations | Busy समय के साथ हर event का title और location देख सकता है | हाँ, अगर आपका admin अनुमति दे |
| Can view all details | आपके events की हर जानकारी देख सकता है, पर बदल नहीं सकता | हाँ, अगर आपका admin अनुमति दे |
| Can edit | आपके calendar पर events देख सकता है, बना सकता है, बदल सकता है और delete कर सकता है | नहीं (personal Outlook.com accounts edit access शेयर कर सकते हैं) |
| Delegate | वह सब जो editor कर सकता है, साथ ही आपकी ओर से meeting invitations पाना और उनका जवाब देना | नहीं, सिर्फ़ उसी organization में, सिर्फ़ primary calendar के लिए |
Private चिह्नित events हर level पर छिपे रहते हैं (लोग सिर्फ़ यह देखते हैं कि आप busy हैं), जब तक आप किसी delegate को उन्हें देखने न दें।
new Outlook या Outlook on the web में अपना calendar शेयर करें
New Outlook for Windows, Outlook on the web (outlook.office.com) और Outlook.com में steps एक जैसे हैं:
- Navigation pane में Calendar चुनें।
- Home tab पर Share calendar चुनें। अगर आपके पास एक से ज़्यादा calendar हैं, तो वह चुनें जिसे शेयर करना है। आप My calendars के नीचे किसी calendar पर right-click करके Sharing and permissions भी चुन सकते हैं।
- ऊपर के box में व्यक्ति का नाम या email address लिखें। सूची से उन्हें चुनें, या अगर वे न दिखें तो Enter दबाएँ। आप एक बार में एक व्यक्ति जोड़ते हैं।
- उनके नाम के बगल वाला drop-down खोलें और कोई permission level चुनें।
- Share चुनें।
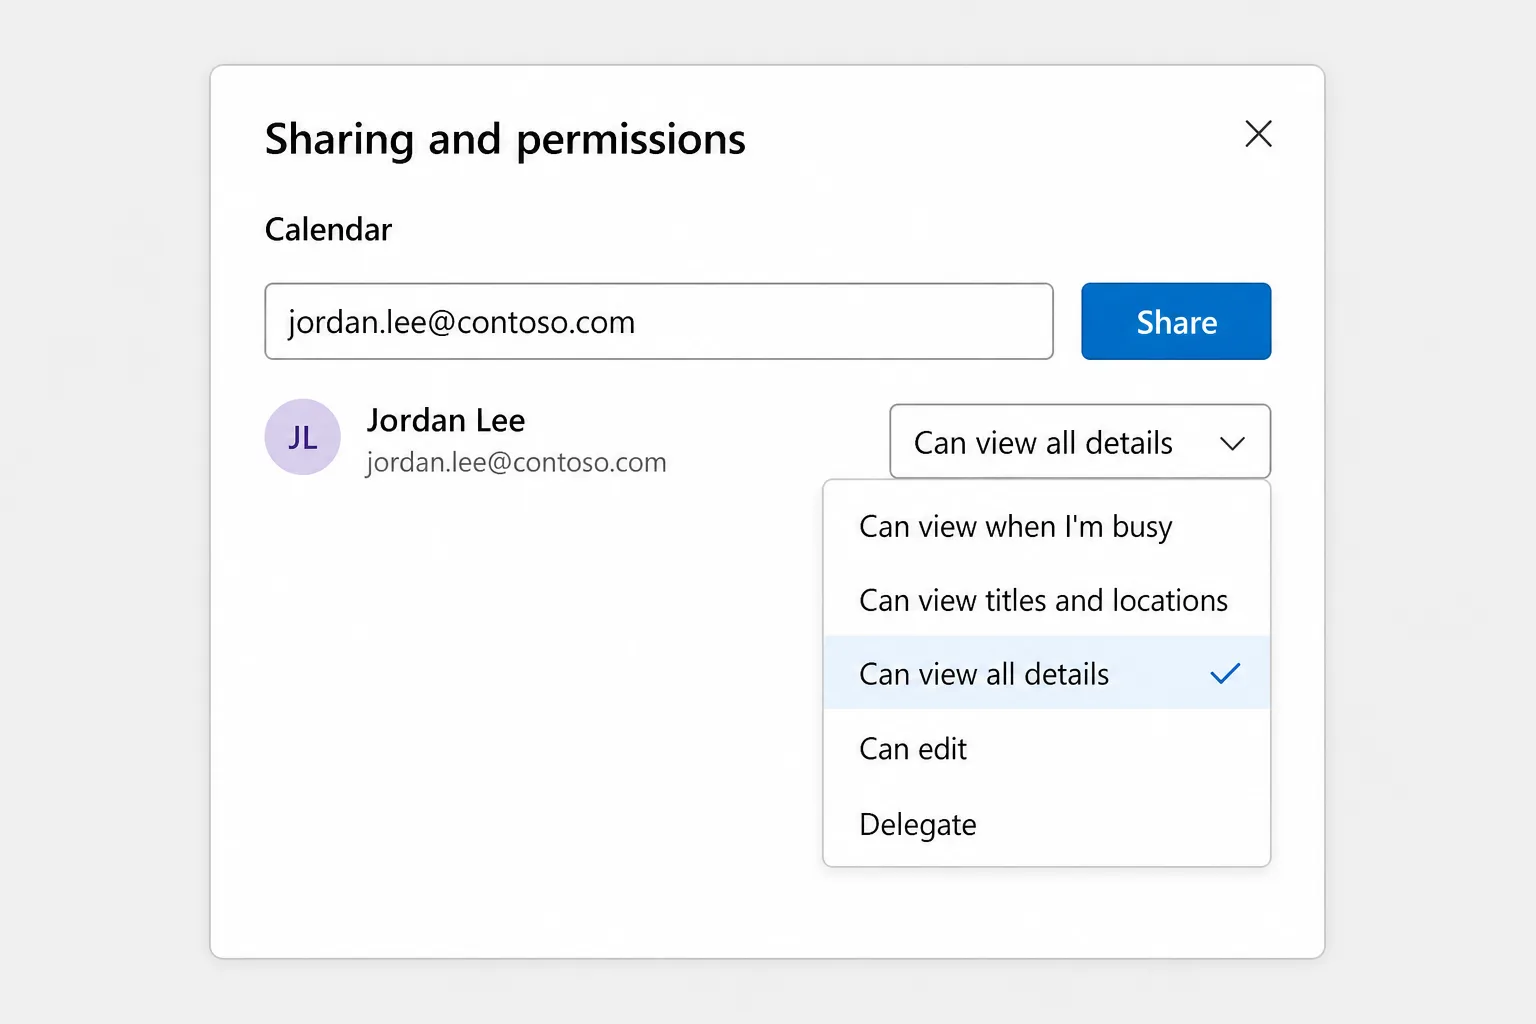
अगर आप Delegate चुनते हैं, तो अतिरिक्त options दिखते हैं: Let delegate view private events, और Delegates के नीचे Send invitations and responses to setting, जहाँ आप Delegate only, Delegate and send me a copy या Both my delegate and me चुनते हैं। Delegate access सिर्फ़ आपके मुख्य calendar पर काम करता है; editors आपके स्वामित्व वाले किसी भी calendar में जोड़े जा सकते हैं।
Personal Outlook.com accounts में कम levels मिलते हैं: आप view या edit access शेयर कर सकते हैं, पर delegate access नहीं।
Windows के classic Outlook में अपना calendar शेयर करें
- अपना Calendar खोलें।
- Home tab पर Share Calendar चुनें और सूची से calendar चुनें। (पूरे ribbon में उसी group का Calendar Permissions वही window खोलता है।)
- Calendar Properties में Permissions tab पर Add चुनें।
- अपनी address book में खोजें या email address लिखें, Add चुनें, फिर Add Users dialog में OK चुनें।
- सूची में व्यक्ति को चुनें और तय करें कि वे कितना देख सकते हैं। मौजूदा Microsoft 365 versions में वही levels हैं जो new Outlook में हैं; पुराने versions में Reviewer या Editor जैसे options दिखते हैं।
- OK चुनें। व्यक्ति को स्वीकार करने के लिए email invitation मिलता है।
Classic Outlook में किसी को delegate access देने के लिए इसके बजाय File → Account Settings → Delegate Access → Add इस्तेमाल करें। डिफ़ॉल्ट रूप से delegate को आपके calendar पर Editor permission मिलती है।
Outlook for Mac में अपना calendar शेयर करें
आपके और दूसरे व्यक्ति, दोनों के पास Microsoft 365 या Exchange work या school account होना चाहिए।
- Sidebar में calendar icon चुनें।
- जिस calendar को शेयर करना है उस पर Control-click करें (या उसके बगल का … menu इस्तेमाल करें) और Sharing Permissions चुनें।
- Calendar Properties में + button पर click करें।
- व्यक्ति को खोजें, उनका permission level चुनें, और Add पर click करें।
पुराने Outlook for Mac में वही window Organize → Calendar Permissions के नीचे है। अगर आपका सहकर्मी Mac इस्तेमाल करता है तो एक बात जानना ज़रूरी है: आपका calendar खोलने के लिए उन्हें कम से कम Reviewer-level access (यानी all details देखने के बराबर) चाहिए। Free/busy access तभी दिखता है जब वे आपके साथ meeting schedule करते हैं।
अपने फ़ोन से शेयर करें
iPhone या Android के Outlook में Calendar खोलें, ऊपर बाईं ओर calendar icon या menu पर tap करें, फिर जिस calendar को शेयर करना है उसके बगल के gear icon पर tap करें। वहाँ से आप लोगों को जोड़ सकते हैं और तय कर सकते हैं कि हर कोई क्या देख या edit कर सकता है। Sharing Microsoft 365, Exchange और Outlook.com accounts के साथ काम करती है, app में जोड़े गए Gmail या iCloud accounts के साथ नहीं।
दूसरा व्यक्ति आपका calendar कैसे स्वीकार करता और खोलता है
- आपकी organization के अंदर: वे invitation email खोलकर Accept चुनते हैं। आपका calendar उनकी calendar list में जुड़ जाता है। Classic Outlook में यह Shared Calendars के नीचे दिखता है, जहाँ वे उस पर right-click करके Overlay चुन सकते हैं ताकि वह उनके अपने calendar के ऊपर दिखे।
- Invite का इंतज़ार किए बिना: work या school account वाले सहकर्मी, जब तक आपने उन्हें access दिया है, new Outlook में Add calendar → Add from directory से आपका calendar खुद जोड़ सकते हैं।
- Outlook.com users को Accept and view calendar button वाला email मिलता है।
- फ़ोन पर: अगर email में Accept button है, तो उस पर tap करें। अगर सिर्फ़ link है, तो वह स्वीकार करने की प्रक्रिया पूरी करने के लिए Outlook on the web खोलता है।
Gmail और Google Calendar users के साथ अपना calendar शेयर करें
आपके पास दो विकल्प हैं।
उनके address पर sharing invitation भेजें। इसे स्वीकार करने के लिए उनके पास Microsoft 365 या Outlook.com account होना चाहिए, इसलिए Gmail users के लिए यह अक्सर बंद गली साबित होता है।
ऐसा link publish करें जिसे वे subscribe कर सकें। यही भरोसेमंद रास्ता है:
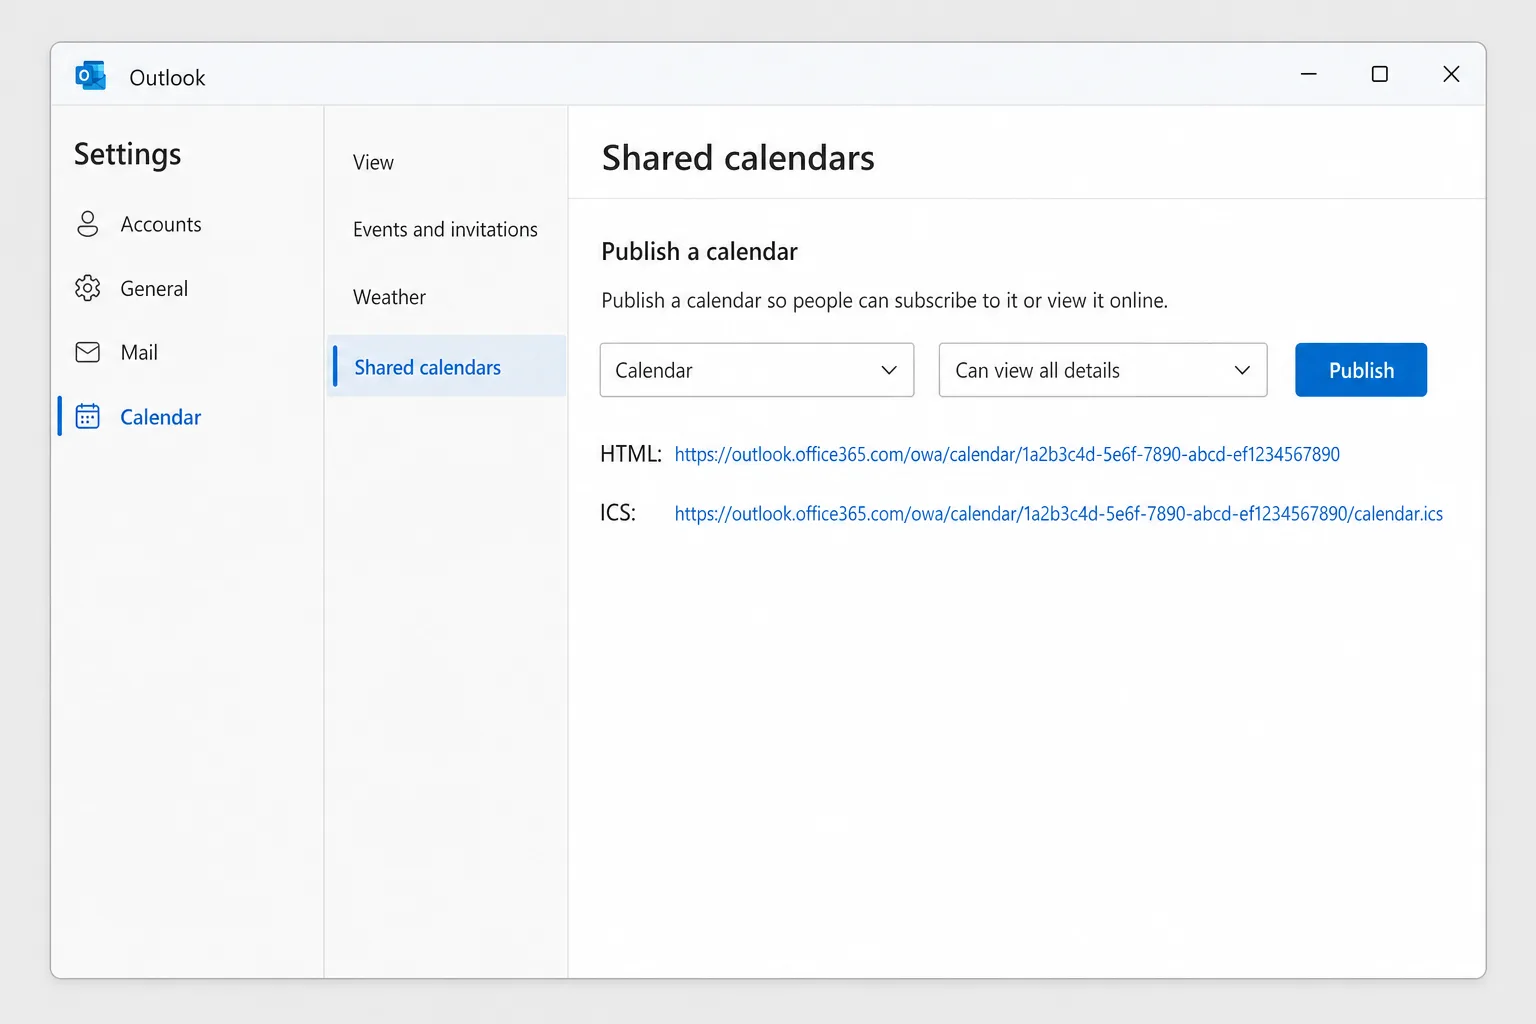
- New Outlook या Outlook on the web में Settings → Calendar → Shared calendars पर जाएँ (new Outlook में आप इसे View → Calendar settings से भी खोल सकते हैं)।
- Publish a calendar के नीचे calendar चुनें और तय करें कि कितना detail शामिल हो, जैसे Can view all details, या कम के लिए Can view titles and locations।
- Publish चुनें। एक HTML link और एक ICS link दिखाई देते हैं।
- ICS link व्यक्ति को भेजें।
Computer पर Google Calendar में वे Other calendars के बगल के + पर click करते हैं, From URL चुनते हैं, ICS link paste करते हैं और Add calendar पर click करते हैं। (URL से subscribe करना Google Calendar के phone apps में उपलब्ध नहीं है, पर जुड़ जाने के बाद calendar उनके फ़ोन पर भी दिखता है।)
HTML link आपका calendar किसी भी browser में खोलता है। दोनों links read-only हैं, लेकिन जिसके पास भी वे हैं वह आपका calendar देख सकता है, इसलिए उन्हें सोच-समझकर शेयर करें। Google subscribed calendars को अपने समय-क्रम से refresh करता है, इसलिए नए events दिखने में घंटों लग सकते हैं। Links रद्द करने के लिए Unpublish चुनें।
अगर Publish a calendar section नहीं है, तो शायद आपके admin ने publishing बंद कर रखी है।
Permissions बदलें या sharing बंद करें
- New Outlook और Outlook on the web: calendar पर right-click करें, Sharing and permissions चुनें (या Home → Share calendar पर जाएँ), फिर drop-down में level बदलें या व्यक्ति के बगल का remove icon चुनें।
- Classic Outlook: Folder → Calendar Properties → Permissions, व्यक्ति को चुनें, फिर उनका level बदलें या Remove और OK चुनें।
- Outlook for Mac: Sharing Permissions खोलें, व्यक्ति को चुनें, − button पर click करें, फिर Done।
आपकी organization के बाहर के लोगों के पास जो वे पहले देख चुके हैं उसकी copy रहती है, पर वह update होना बंद हो जाती है। Removal को sync होने में कुछ समय लग सकता है।
Calendar sharing काम क्यों नहीं कर रही
Share button greyed out है या दिख नहीं रहा। आमतौर पर आपकी organization की कोई policy calendar sharing को रोकती है, या बाहरी addresses के लिए रोकती है। यह आपका IT admin नियंत्रित करता है। यह तब भी गायब रहता है जब calendar आपका नहीं है (आप सिर्फ़ अपने स्वामित्व वाले calendars शेयर कर सकते हैं) या account IMAP/POP account है, जैसे Outlook में जोड़ा गया Gmail। Sharing के लिए Microsoft 365, Exchange या Outlook.com account चाहिए।
"This calendar can't be shared." Classic Outlook यह तब दिखाता है जब address मान्य नहीं है, किसी व्यक्ति की जगह Microsoft 365 group का है, या external sharing की अनुमति न होने पर आपकी organization के बाहर के किसी का है। Address जाँचें, या इसके बजाय link publish करें।
बाहर के लोगों को सिर्फ़ free/busy दिखता है। आपके admin की sharing policy बाहरी domains के लिए अधिकतम detail तय करती है। Outlook में Can view all details चुनने से वह नहीं बदलती।
दूसरा व्यक्ति आपका calendar नहीं देख पा रहा। जाँचें कि उन्होंने सचमुच invitation स्वीकार किया है (वह कभी-कभी Junk में चला जाता है), और वे उसे उसी account से खोल रहे हैं जिससे आपने शेयर किया था। Mac users को कम से कम Reviewer-level access चाहिए। Mobile पर shared calendars को दिखने के लिए calendar list में चालू करना पड़ सकता है।
Events गायब हैं या पुराने हैं। Shared calendars आमतौर पर जल्दी sync होते हैं, लेकिन ICS subscriptions पाने वाले app के समय-क्रम से refresh होती हैं, और Google Calendar में घंटों की देरी सामान्य है।
अक्सर पूछे जाने वाले सवाल
details दिखाए बिना अपना Outlook calendar कैसे शेयर करें? Can view when I'm busy चुनें। दूसरा व्यक्ति बिना titles, locations या attendees के busy समय के blocks देखता है। किसी एक संवेदनशील event के लिए इसके बजाय उसे Private चिह्नित करें।
क्या मैं अपना Outlook calendar ऐसे व्यक्ति के साथ शेयर कर सकता/सकती हूँ जो Outlook इस्तेमाल नहीं करता? हाँ। Settings → Calendar → Shared calendars से अपना calendar publish करें और उन्हें ICS link भेजें। यह Google Calendar, Apple Calendar और ज़्यादातर दूसरे calendar apps में, read-only के रूप में, काम करता है।
क्या कोई मेरा Outlook calendar edit कर सकता है? हाँ, अगर वे आपकी organization में हैं (या आप दोनों Outlook.com इस्तेमाल करते हैं) और आप उन्हें Can edit या Delegate देते हैं। आपकी organization के बाहर के लोग सिर्फ़ देख सकते हैं।
Sharing और publishing में क्या फ़र्क है? Sharing खास लोगों को invitation भेजती है और आप edit access दे सकते हैं। Publishing एक read-only link बनाती है जिसे जिसके पास भी हो वह खोल सकता है, जो Outlook न इस्तेमाल करने वालों के लिए काम का है।
क्या लोग मेरे private appointments देखेंगे? नहीं। Private चिह्नित events आपने जो भी level शेयर किया हो, सिर्फ़ busy समय के रूप में दिखते हैं, जब तक आप किसी delegate को private events देखने न दें।
Scheduling की आगे-पीछे की बातचीत में कम समय लगाएँ
Calendar शेयर करने से "आप कब free हैं?" वाले emails घटते हैं, पर meeting threads फिर भी जमा होते रहते हैं: कोई मंगलवार सुझाता है, कोई और सिर्फ़ गुरुवार कर सकता है, और तीन replies के बाद किसी को पक्का नहीं पता कि क्या तय हुआ। CoreGPT for Outlook लंबे thread का summary कुछ पंक्तियों में बना देता है, ताकि आप हर message दोबारा पढ़े बिना फ़ैसले, खुले सवाल और अगले कदम देख सकें। शुरू करना free है और यह new Outlook, classic Outlook और Outlook on the web में चलता है।
 CoreGPT
Priya Shah
Re: Q4 लॉन्च टाइमलाइन
क्या हम तारीख़ें पक्की कर सकते हैं…
Marco Rossi
कॉन्ट्रैक्ट रिन्यूअल
अपडेट किया हुआ संलग्न है…
सपोर्ट
टिकट #4821 सुलझ गया
आपका अनुरोध…
Emma Clark
गुरुवार को लंच?
क्या आप लगभग … ख़ाली हैं
Re: Q4 लॉन्च टाइमलाइन
Priya Shah
अगर हम 3 नवंबर का लॉन्च रखते हैं तो मार्केटिंग को फ़ाइनल कॉपी 28 अक्टूबर तक चाहिए। क्या इंजीनियरिंग पुष्टि कर सकती है कि रिलीज़ कैंडिडेट समय पर है?
Daniel Kim
RC 30 अक्टूबर तक समय पर है। QA को पेमेंट फ़्लो के लिए दो दिन और चाहिए, इसलिए 3 नवंबर मुश्किल है पर संभव है।
Priya Shah
अगर QA में देरी हुई तो क्या हमें लॉन्च 5 नवंबर तक खिसका देना चाहिए?
सारांश:
- लॉन्च 3 नवंबर को प्लान है
- RC 30 अक्टूबर तक, QA को 2 दिन और चाहिए
- विकल्प: लॉन्च 5 नवंबर तक खिसकाएँ
आज़माएँ: CoreGPT for Outlook
ये भी पढ़ें: